Saturday 30 June 2012

DIY: Marbleized Paper/Canvas


This is a great activity for you and the kids... or just for you... Heck, I don't have kids and I LOVE doing it!! I always make my own cards and invitations so I like to do a bunch at a time so I have some when I have to create a random card. It really gives it a great look! Or they are great for table place cards or gift tags. I've always wanted to do these on bigger sheets or do a whole pile of them and decoupage my desk!! Looks awesome as a back splash on a canvas too. Or paint the canvas black and put colours and white. Ooohhh  Hello Wall Art!! Quick next project - Check!!

Anyways, it's really quite quick and simple, not too mention fun... it can get a wee bit messy, but what kind of fun is it with no mess? Anyways, no matter what you decide to Marbleize, use the method below.

Here's what you'll need:
Shaving cream - Must be foam, not gel
Paint (acrylic, tempera) or Food colouring - Whatever colours you choose, variation up to you!!
Paper/Canvas for marbleizing - Cardstock works best
Shallow tray on pan - That will fit your paper
Toothpicks 
Cardboard or card - To spread & remove shaving cream 


Here's what you'll do:

Fill your shallow pan or tray with a layer of shaving cream approximately 1/2 thick so it covers the whole bottom of the tray. Using a piece of cardboard or a card spread the shaving cream into an even layer.


Drip your colours of choice onto the shaving cream in various locations.


Once you have the desired amount of paint use the toothpicks to drag the color through the shaving cream. Drag back and forth in one direction then back and forth crosswise. Go in swirls and circles if you like. You may need to add more color as you go until you have the proper amount.


Gently press your paper into the shaving cream, making sure it is fully covered and then carefully lift it out and place it aside.


Repeat the above steps with the rest of the paper. You will most likely have to drip more colour into the shaving cream and spread around with toothpick as the paper will lift the color out of the shaving cream. You can continue using the same shaving cream for awhile. 

Leave your sheets of paper aside with the shaving cream on them for a couple minutes allowing the colour to really set in the paper.  


Grab a piece of cardboard and gently guide the shaving cream off of the paper, wiping them clean with paper towel afterwards if you still have some cream left.


There you have it! Marbleized paper/canvas! Pretty easy huh? Decorate the marbleized paper as you wish and you are good to go!

 
 xOx

Click here to Like Designs & Decor on a Dime on Facebook.

Summer DIY Games... For you and the Kids!


Bored? Have a house full of kids? Having people over for a weekend BBQ? Need something to fill up some of your day? Check out some of the following DIY ideas to keep you busy and entertained this summer!

Outdoor Twister
This one is for both the adults and the kids... :) Come on, you can't say a little Twister and some drinks in the backyard isn't one of the funnest things to do on a Saturday afternoon or evening!

Grab a white sheet and paint circles on to match a Twister Board. Let dry. If you want to skip the sheet and just paint circles on the grass, that works too! Oh and make sure you let the paint dry before playing!! If you don't have an old Twister spinner you can make up labels and draw from a box or container or make up your own creative way of picking what body part goes where!!


The Tire Swing
If you are lucky enough to have a big tree in your front or back yard, then hang up a tire swing!! These are perfect for the kids to play on. I used to relax on one all the time as a kid!! Paint it a nice bright colour to make it much more enjoyable and more apt to hang out on!


Horseshoes!
And then there's the classic game of Horseshoes!! Everybody loves 'em! And they are perfect if you are having a few friends over or up at the cottage!


What you'll need:
4 Horseshoes
2 Stakes
Scoreboard - Sheet of paper works good! lol!

If you wanna get really fancy, build an actual box with 2x4's around your stake and fill pit with sand. When I was in highschool we had a pit in our backyard, it was awesome! We would always have tournaments on the weekends!!

Put your stakes in the ground approximately 40 feet apart. You get 2 horseshoes per person or team. Most games are played to 21 points and the winner must win by 2.

Points: 
Horseshoe lands within 6 inches of the stake – 1 point
Leaner - the horseshoe leans on the stake - 2 points
Ringer - the horseshoe completely latches the stake - 3 points


The Human Bubble!
This is super cool if you have a bunch of kids over for a birthday party... or if you are just the lucky house on the street and entertain all the kids on the block. All you need for this is a plastic pool, a hula hoop and Dial Dish Soap (Not anti-bacterial). Mix 10 cups of Dial Dish Soap in 5 gallons of distilled water. Mix it in the pool and let it sit over night (or as long as you can).


Have the kids (one at a time of course) stand in the pool and have them or someone else raise the hula hoop! They'll be inside the bubble! Get them to get a blower and blow little bubbles inside the big bubbles. Take lotsa pictures! These definitely would make great action shots for some wall art! 

Sun Beads! 
Similar to stained glass sun catchers but a lot more easy and quick to make! Great activity for the kids... okay and us adults too! I love the finished product glazing in the sun! Beaaaauuutiful!!!!


Here's what you'll do:
Layer plastic beads in cake pans (no lining required for these) and then put it in the over at 400F for 20 minutes. Let them cool. Once cool take your pan and you can just flip them out. Drill a hole in it, lace it with a string and hang it up to make it a sun catcher.

Pop Bottle Water Sprinkler!!
Well hey... it's easy... and soooo cheap (like me, lol) and you get to drink a nice bottle of refreshing Pepsi before you make it!


Take your pop bottle, poke holes in it. Attatch the bottle end to the hose and twist on. Seal with electrical tape. Turn on the hose and run through the home made sprinkler you got!! Easy as 1 2 3.

Rainbow Bubble Snakes!
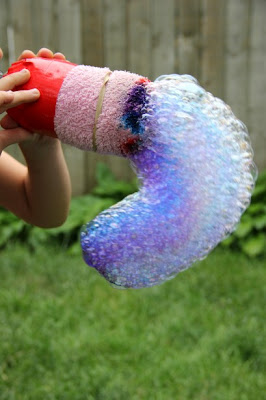
Cut off the bottom of a water bottle. Then slide the sock over the bottom of the bottle.  Use an elastic or Duct Tape to secure. Pour some dish soap into a shallow container with a little bit of water and gently mix.  Add some food colouring, mix the colours or just add one! Dip the sock covered bubble blower into the solution and gently blow.


I think these are super cool and we are gonna make them for Canada Day using red bubbles!!! :)

Backyard Jenga
We all have probably played Jenga a time or two in our day. But have you played the Giant Outdoor Version?


If ya wanna make em' go to your Dad's or Grampa's and see if they have extra 2x4’s laying around BEFORE going to the store (LOL) and cut them into approx 10 ½ inch long pieces. Make 54 pieces! Once your done sand them to make them easier to work with... we don't want slivers, they suck. If ya wanna get really fancy, decorate em with paint or write on them for fun!

Click here to Like Designs & Decor on a Dime on Facebook.

Decoupage ... The Lamp Shade Redo

I've started changing the colour scheme in the living room a little bit... I tend to get sick of colours quite easily actually. So instead of going drastic and doing all the walls, I do the little things.. like mirrors and lamps or picture frames.

Change the season, why not change the colour? I on the other hand, have a little bit of a problem with changing things to my favorite colour... The boyfriend... HATES all my bright cheerful colours, like orange and yellow! He says NO WAY!! Gurr on him, one day, I think I will just do it anyway... but not now! lol

What better way to redo a lamp than to throw some decorative paper on it and decoupage away! and I love my Mod Podge, so out it came. I have loads and loads of decorative scrapbook paper, so went through it and grabbed a few sheets for the shade!

You don't need much for decoupage! Once you have all your main supplies you will be good to go for awhile. 

What you'll need:
Lamp Shade
Paint
Decorative Paper
Mod Podge or Glue
Sealant
Sponge/Paint Brush - Or your hands, whichever you prefer
Sandpaper - If you are doing multiple coats of sealant


Thought it needed a little colour, so painted the top and bottom to match the mirror I just painted. So I taped up the top and bottom with masking tape and grabbed my purple (the colour of choice) and my sponge and went to work! If you are painting the shade with a lighter colour of paint, you might have to do a couple coats to get the right colour, the fabric tends to really soak up the paint!


Once it dries (which really doesn't take all that long with acrylics) I peeled off the tape and it was ready for the paper! Oh the fun part! I love getting my hands dirty!! lol

I took my paper and cut them into smaller strips so it would wrap around the shade just right. I also find it easier to work with smaller sections when I'm dealing with Mod Podge or glue.


I mixed my Mod Podge with a little bit of water to make it more creamy and so it will go a lot further and I put it in a container or a plate so it's easier to mix and get at with the sponge. Glue the back of the paper and stick it in place on the shade. Starting at the top, smooth the paper down making sure its stuck and there are no bubbles. Smooth a thin layer of Mod Podge on top of the paper.


Note: If working with glue, and not Mod Podge, I find it better to wait until the end to apply the top layer, grab your decoupage sealant and apply.

Repeat the above steps until the lamp shade is complete.


Let dry. I like to let mine sit ALL day or over night, making sure it's nice and dry. Depending on the look, you might want to continue applying layers of sealant. Remember, every few layers of sealant, perform a light sand (400).


Throw it on a lamp and it's ready to go!  Mine's not completely done as I still have to sand it... but that will be today! It really does amaze me just how much changing a few things in the home can really have such a positive affect on a person! I love keeping busy and I love looking around thinking... yup, I did that... Now what can I get up too. lol... What have you redone lately??

xOx

Click here to Like Designs & Decor on a Dime on Facebook.

Friday 29 June 2012

3 Simple Wall Art Ideas


I know we all have looked at a wall a time or two and said... what the h*** can I do with you... Or your looking at your wall now saying ... this really has to go.

There are lots of simple Wall Art ideas out there... maybe you will see something you like... and then think oh yah I like that... and I can do this to it... and that to it... I know a lot of my ideas happen in my sleep, I keep a diary beside my bed and wake up, smoke, and write down my ideas... call me crazy, but it works! I always tend to semi-remember what I meant! lol

To view above image, layered frames DIY tutorial, click here.

Like this Mod Podge'd Tissue Paper to a Canvas! (Shown below) Great and simple idea!
And you can purchase most of the supplies at the Dollar Stores.. even the canvas..


Leave your canvas white or paint it the colour of your choice. If painted, let dry. Cut out the tissue paper in the pattern, shapes or design you want and layer the back of them with Mod Podge. Stick them to the canvas. You can choose to Mod Podge over them or leave them as is. Just make sure it's completely covered on the back. Smooth out the bubbles and wrinkles and you are done!! Some might even choose to leave the wrinkles there... it kind of gives it attitude and makes it your own!

The Family Handprints! - Super Cute - Nuff Said!


Whether it's all the kids hand prints or the whole families this would look great in your family room!! Or anywhere for that matter! Layer everyone's hand in paint and press down on the paper you decide to use as your background. Simple and beautiful!!

Bubble Art - Soooo Cool!!!! Love this! (#1)


All of these are pretty cool pieces of wall art. I've done the paint chip art before... but the bubble art really really caught my eye! Definitely going to be giving this a whirl... sooner than later!

Here's what you'll need:
Bubbles
Water-soluble ink in various colours
Watercolour paper (Can use normal to thick paper if you like)
Frame

Here's what you'll do:
Mix inks and bubbles together in a 1-to-1 ratio (mixing each colour separately). Lay paper flat on drop sheet, cardboard or newspaper and start blowing bubbles of various colours onto the paper. Once you have your desired look allow to dry thoroughly. Once dry, hang in a frame to dry!

I love love love this look!! Can't wait to get home today and try it out! I hope you do toooo!

xOx

Click here to Like Designs & Decor on a Dime on Facebook.

Make your Dog Some Treats! The How To!


If you are as big as puppy lover than I am.. then ahem, this DIY is for you!! Just think, you love baking cookies for your loved ones right? Well, who do you love more than your puppy? .... lol

Anyways, these bad boys are really quite easy to make. If you are really in the loving mood, dress them right up and make them real fancy and full of love!! This seems to be the easiest recipe that I have come across.

What's in em':
2 Cups 100% Organic Whole Wheat Flour/Rolled Oats/Wheat Germ - Or a Mixture of all previous ingred.
2 Jars of Pureed Baby Food (4oz Jars)

*You can use any flavour of baby food you want... or what you think your puppy will want... from chicken to apple, or beef, or potato.. even throw in some peanut butter!! Stay away from onion/onion powder and artificial flavours.


What you'll do:
Preheat your  oven to 350°F.

Mix all of your ingredients together to form a stiff dough. You might have to add extra flour or water. 
Lightly flour a surface and roll out the dough until it's about a 1/4 inch thick. Once your dough is ready grab your cookie cutters and start cutting out some cookies! Use a variety of shapes or make a pan and cut them into squares or make them into balls! If you know your dog likes fruit and you have some in the fridge that you don't think you will eat, maybe include that in their treats!! 

Make them with LOVE!!


Line a cookie sheet with wax or parchment paper or grease the pan. Place your treats on the tray about 1/2 inch apart. Bake for 20 to 25 minutes allowing them to cool completely on the counter before storing them in a paper bag. The paper bag will increase the crispiness and harden the treats! If your treats end up soft, don't worry, they are still edible!!


xOx

Click here to Like Designs & Decor on a Dime on Facebook.

Thursday 28 June 2012

And the Winner isssssss....

Congrats to #26 who is:
WKath Nicholls

Please send me a message through Facebook with your address by tomorrow morning at 9am!! 

This contest was out of 33 posts. It says there is 35 (the last one being mine, so it didn't count).
So then I thought it would be out of 34... but just to make sure, I counted the comments and got 33. UGH! So I counted again and still got 33. So I did it one more time and still got 33. So that is my reasoning behind that! LOL


Thanks for everyone's likes and I hope you are checking out the blog! I'm trying to get posts up daily as much as I can, but it's hard with such a busy lifestyle!

Well, we are almost at 200, which means another 2 winner's will be chosen!!! Can we do it!!!????!!! 

xOx

Click here to Like Designs & Decor on a Dime on Facebook.

I Love Chevrons! DIY Chevrons... They look good on pretty much anything!!


Chevrons! They look sooooo good!! I love love love the look! And it doesn't take much to complete either!! Which is right up my alley!

I've been eying up my shelf beside my computer desk for awhile now... thinking to myself, I'm going to chevron the backs of the shelves! ... colours.. and time is my problem! But, just like everything else, it will come, all in good time!

Have something in mind of redo-ing? Thinking this might just be that design you are looking for?

Well, here's how to complete this look!

If you don't have a chevron stencil and if you don't feel like buying one, no biggie, it's quite easy to design your own! Get out your ruler and your tape or card board, depending on which you prefer! Draw and cut out your chevron stencil out of cardboard or tape up your object with painters tape or masking tape. Once you have your object ready to go, you can start to paint.


Depending on your look, you might of painted your object first, before taping, so your 1st colour is already done!

Paint the portions that you want painted with whatever colour you want to paint it. Let dry and remove tape or stencil!


Easy as pie! I know my instructions aren't very good on this one, but I'm in a rush and it really is pretty straight forward. If you need help, message me!... and as per usual, would love to see what you created!!

I love this clutch purse, as you all know, I love clutches!!


If you are doing your wall or a piece of furniture and it's your first time, take something small, like coasters and practice on that first... you know, as the saying goes, practice does make perfect!


xOx

Click here to Like Designs & Decor on a Dime on Facebook.

DIY: Febreze | Better than the Real Deal


I know a lot of us make our own products because it's a heck of a lot cheaper than going out and buying the real thing. Like Febreze here, it's expensive, even with a coupon!!

This trick has been around for awhile and some of you might already use it, but here's the deets on how to mix up your own batch of Febreze!

What you need:
1/8 Cup of Your Favorite Fabric Softener
2 Tablespoons Baking Soda
Hot Tap Water - To Fill the Bottle to the Top

Yup, that's it... now shake it really good!! The above will make a Febreze bottle as shown! Now... go fight them odours! LOL.

xOx

 Click here to Like Designs & Decor on a Dime on Facebook.

Canada Day: DIY Ideas!


With Canada Day being right around the corner, I thought I would share some Canada Day DIY ideas with you! Some you can even do with the kids... you know, since they are off... on summer HOLIDAYS! lol

DIY Canada Day Shorts (Or anything)
Grab a stencil of a Canadian Leaf or Canadian Flag, if you don't have one, print one off of the computer. I like to use sticker paper so I can peel it off and stick it on whatever I am painting!! If you can free hand, that's even better!! Make sure you have red fabric paint for the leaf and paint it with spray or a brush. Once you have painted your leaf or flag, remove the stencil or sticker. If you have glitter, add it if you like! Let dry and you are ready to go!! Throw on a red top and you are good to go!! (not my butt below, lol)


DIY Canada Day Cake 
I'm not the best baker... so I don't think I would be able to make this... but make your own Canada Day Cake for that get together you are having before the fire works begin! You will wow your guests with this kick ass cake!!! It looks so good I almost wouldn't want to eat it... yea, I said almost! LOL.


You can get the tutorial to make this awesome cake by clicking here!

DIY Maple Leaf Magnets
I saw these online and thought them rather cute! Perfect activity for you and the kids!! Or just you!


Here's what you will need: 
White and silver glitter glue
Clean lids from jars of sauce, pickles (anything with a big lid)
Red construction paper
Scissors
Magnets (Heavy duty)
White glue

Once you have the lids you are going to use, take the white glue and paste the magnet on the back, you can use a glue gun if you prefer. Let dry.

Cut out construction paper maples leaves (if you don't have a stencil or aren't the best free hand-er, print some images off the computer) and then cover over with a thin layer of glitter glue. Depending on how thick the glue is, these will take a couple of days to dry, so start today so they will be ready for Canada Day. If you don't have the time and need it to dry fast, skip the glitter glue and just add glitter on top of your white glue. Once dry you are ready to hang up on your fridge or place them outside at your dinner table on magnetic places to give your backyard or house some holiday spirit. Happy Canada Day Canada! 

I've been meaning to start my own Canada Day Shirt made out of a flag.. but it's been delayed.. and I don't know if I'm going to get it done on time :(

xOx

Click here to Like Designs & Decor on a Dime on Facebook.

Wednesday 27 June 2012

Pop Tabs Bag... or Purse!


I know a lot of people who save pop tabs for wheelchairs and fundraisers like that... well, maybe we should start saving them to make our own purse or bag! This does take an awful lot of pop tabs.. and it takes quite a bit of prep work, but it's something to do in your spare time while watching t.v or sitting outside at the cottage! I love projects that don't take much thought where you don't have to "keep track" (like stitches when knitting).

So many things you can make out of stuff you would normally just throw away!

I found a pretty detailed step by step on "how to" put the tabs together on instructables.com for those of you who are going to try this one!! It's not the instructions for the complete purse, but it does show how to connect them, but it really won't be too hard to figure out a purse design, when I finally get my tabs I will be trying and I will be posting! But I have just begun to saving my tabs.. and added this to "the list"... but it might take awhile! lol

If anyone has knows how to make the purse, feel free to let me know!!! love to share!

Click here to get the step by step to make this purse.


xOx

Click here to Like Designs & Decor on a Dime on Facebook.

Decoupage - Lazy Susan Redo


I was bored this afternoon and needed something to do. I was looking around the kitchen thinking... what next.. what can I get up too? I didn't want to start anything too big, considering I have my tv stand to do tomorrow. So I decided to decoupage the lazy susan. If you have never decoupaged anything before, starting with something small is a good idea!

Click here to view a decoupage tutorial

Here's what you need:
Lazy Susan
Decorative Paper, tissue paper, gift wrap
Scissors or Craft knife
Sponge Brush
Decoupage glue (I used Mod Podge, of course, lol)
Sealant/Varnish (Depending on the look you want)

Here's what you do:
Once you know what you are going to decorate your lazy susan (or whatever you are doing) with, cut your pieces if need be, and then place them on your lazy susan, making sure they will fit, but don't glue them down yet! Keeping in mind, you are going to want to make sure there is enough paper to cover the sides of the lazy susan, folding the paper down over the edges. 

Once you know the placement of your cut out pieces, take a picture if you need help remembering. Make sure your lazy susan is clean and dry and you are ready to go!

Take your sponge and glue create a thing layer of paste on your object where the cut out is going to go. Place the cut out on the glue, smoothing it out. Wipe on another layer of glue on top of the cut out, making sure the whole piece is covered and the edges are stuck down. Smooth out the piece to get rid of any bubbles. You are going to want to start in the middle and smooth it out working your way out towards the edges. You can use your sponge, a roller, or your finger to smooth.


I had poured the glue on a plate so it was easier to get at and I glued, applied the paper then glued. I didn't care so much for smoothing out the bubbles as much as I normally would since it's usually covered with stuff anyway!

Complete the same steps until your lazy susan is covered.  You are going to have extra paper hanging over the sides, we are going to trim it with a craft knife or your scissors, leaving about 2" of overlap. Cut slits about every inch or so in the overlap to the edge of the lazy susan. This is going to make it easy to paste the edges down.


If you have a paint brush handy, grab it for this next part or you can use your fingers. Coat the little flaps of paper and the lazy susan where the flap is going to get glued down with enough glue that the flaps will stick. Fold the flaps of paper down over the edge and stick. Apply a thin layer of glue on top.  Continue these steps until all of the flaps are glued down. Rub out any bubbles or edges as best as you can before leaving to dry. I'd leave it for at least 24 hours.


You can leave it like this if you used a two in one glue that acts as a sealant as well or you can continue to add layers of sealant! I really wish that one piece of paper would have fit on this so it would look a little better, but like I said, it's usually covered!

Take your Lazy Susan and apply a thin coat of sealant. Allow to dry completely and give it another coat.
Repeat steps until you get the desired look you want!


After 3 or 4 coats, give it a light sand with sandpaper (400). You can leave it like this or you can continue coating with sealant! Some artists coat their objects up to 40 times!!! Can you imagine! But oh the look!!

I chose to give it a few layers of sealant and I'm doing my first sand as we speak... or as I type.


There! Done! Sanded... almost to perfection! The more I would have sanded it, the more it would have looked all as one piece and sooo smooth! I gave it one more coat of sealant to finish it off, letting it dry and it will be back on the table tomorrow!!!


Yup, back on the table... pretty much covered! lol
xOx

Click here to Like Designs & Decor on a Dime on Facebook.