Showing posts with label Organization. Show all posts

Sunday, 22 July 2012

DIY: Vintage Key Frame


Don't know where to hang your keys? Or don't like what you have now? Make a vintage frame into a key holder! This would even make a wonderful house warming gift for your friends... or kids!

If you don't have old frames around your house, ask your parents. I am ALWAYS on the look out for stuff like this at all times... just in case for quick projects like this. Thank god for storage! Although it's getting awfully full! LOL

What you need:
Frame
Screw Hooks
Screw Driver
Paint - If need be, colour of choice

What you do:
Paint your frame the colour of your choice. Rub some off for the vintage look. It would also be cool if you did the faux metallic (with the tin foil)... or just buy the metallic paint, it's just expensive I find!

Drill holes into the frame (size to match your screws). After holes are drilled, screw in each hook. And your done!

Easy as pie and looks great! Mount it to your wall and put your keys in there! Or wrap it up as a gift!

xOx - L

Click here to Like Designs & Decor on a Dime on Facebook.

Friday, 20 July 2012

A Couple DIY Shoe Rack/Holder Ideas.... Ahhhh Shoes!!!


I LOVE SHOES!!!!! I say that with all caps because I mean it. I LOVE them. With the bottom of my heart! Shoes and purses. Ahhh!

Well, with a lot of shoes... comes a lot of space to have to put them. So we have to use our space efficiently. I know I have a lot of shoes, I can go count, but I don't want too... and half of them are in storage bins at my boyfriends Moms house! We live in an apartment so space really is limited. But you gotta make the most of what you got... or get rid of some shoes... and that's probably not gonna happen, not in my case anyways!

You can always make the tulip shoe tree!! It doesn't hold many shoes, but it sure is cute!

If you are a heel girl like me... this here is a wicked idea to put crown molding on the wall and hang your shoes there! It's a good wall filler if you are drawing a blank!!! It would also be a nice space saver for in the closet if you have room above the coats.


Is your front door crowded with shoes! Your hubby's shoes, your kids shoes, their friends shoes! I remember when I used to live at my parents, our shoes (and half the neighbourhoods) would be all over right at the front door and she used to get so frustrated! LOL... Now I totally understand how she felt, but back then, I just didn't care! Sorry Mom. I love you! This drain pipe shoe rack would have came in handy back then eh?


If you have an idea, post it here!! Mine are just in one of those ugly boring fabric shoe holders that hangs from the closet... It hold a lot of shoes, but it isn't the prettiest. I guess that's why it goes in the closet. But I was thinking, I might cover it with a piece of fabric or something. That way it won't be such an eye sore. Good idea Linds!!! Add it to the book! lol

xOx - L

Click here to Like Designs & Decor on a Dime on Facebook.

Thursday, 19 July 2012

Turning Drawers in to Shelves!


So my boyfriend comes home with two drawers in the back of his truck last week. When I seen that he didn't have any thing else... like a stand or a dresser, I realized... I think he has a project in mind.

Yup, I hit that nail on the head! I asked him what they were for. He said you hunny! hahaha! Too funny, I don't effin' want them! Just another thing to add to "Lindsay's F'n List of Things To Do". He wanted me to make him "drawer shelves" because I mentioned them once before. He had them stuck in his head. So since I love him Oh So Much, I decided I would make them for him... you know, for his "Man Cave".  So they sat there, taking up space, until I just couldn't look at them anymore. They have to be done, they have to get out my space and in to his. You know you love someone when you do their shelves before your t.v. stand...and ALLLLLL your other projects... LOL

These are just ordinary drawers, they look like they were from a desk. I believe Kev found them on the side of the road on good garbage day to tell you the truth... Hey now, nothing wrong with that... have you ever seen what rich people put on their curbs? Man, I'm telling ya, sometimes you can find real gems!


So I got out my trusty tool set and went to work removing the handle and the side sliders from both of the drawers.


If there are any holes, fill them with wood. If you are going to be connecting your drawers to attach the shelves later, you can leave two of the holes in the front (where the drawer handles used to be) to attach them after you are done painting. I didn't know what we were doing with it yet... so I just decided to fill all the holes and deal with it later.


Yup, I'm messy, I know!! lol

Once the wood filler is dry, it's time to sand. Sand the drawers where you are going to paint to roughen them up so the paint sticks better... and sand the wood filler where the holes were making it nice and smooth and even, you don't want to see them when you paint!


I decided not to paint the whole drawer, so I taped off some edges before painting. Tape any edges off before painting if need be. Make sure the tape is tightly pressed down on the edges, you don't want the paint to leak. If you did a base coat first and want to do some fine edge work, tape the edges and paint over the edge of the tape with the colour of the base coat. Let it dry and then paint your second coat. The base coat seals the tape and gives it a lot less chance of seepage.


And it was time to paint. Woo hoo! I decided on black because it will match all the other shelves in his room. After the first coat was done and dry, I gave it a second coat. Looking at it, I knew I definitely didn't need a third coat, so before the paint was dry, I peeled off all of the painters tape. The paint peels and sucks real bad if you leave the tape and remove it when the paint is dry... trust me... I know from previous experiences, LOL.


I was going to put a stencil in the background of Kev's fav show SOA (Sons of Anarchy), but he saw the shelves and he decided he wanted them now... and he said quote unquote "people aren't going to see them anyway, what's it matter what it's got on em".... MEN (well most of them)! They just don't understand!!!!!


So... I did a final coat of protector/sealant on the shelves, a little saddened that I didn't get to do the stenciling might I add, but only for a short minute, on to the next project that's been waiting for awhile... my t.v. stand.


Before Kevin could take them for his "Man Cave" I decided to decorate them just a little bit... you know, so they didn't look so bland for my pictures! Yay Me! I'm learning! LOL

xOx - L

Click here to Like Designs & Decor on a Dime on Facebook.

Wednesday, 18 July 2012

DIY: Make a Mini Notebook

Another fetish of mine is note books. I'm constantly writing notes or jotting things down. We always browse down the note book aisle at the Dollarama... and of course, I get one pretty much every time. I almost have too many... but there is never "too many" in my world.

This is a great notebook cuz it's small and it will fit right in my smallest purse. I need to have an on the go book for those random thoughts that I get when I'm out... or if I remember I need something. Then there is the "dedicated notes" note book that we use to write each other quick back and forth notes! Cute I know.... but they aren't always lovey dovey... most of the time it's more like "clean this, or get this while you are out". haha okay, and back on track I go.

One of the good things about making these note pads is if you use a big enough cereal box... and your note books are a smaller size (like these ones) you can usually get a couple note books out of one box. So make a few while you are at it! Keep them for yourself, or give them away to your friends as gifts, they really are quite cute once they are done... and they don't take too long to finish either!


Materials you will need:
Cereal or Oatmeal Box
Ruler
Paper (white or lined, whichever you prefer)
Pencil
Button
Needle & Embroidery Thread or Thread (I like thicker for this, you can see it better)
Glue
Scissors
Decorative Paper

What you do:
Take your cereal box and cut it so it's flat. Use your ruler and measure out the size of the note book. I did mine 8.5" by 6", but you can do yours whatever size you like, whether it's smaller, or bigger. If you are using a big cereal box, you can get two or three note books, so you might as well do a couple while you are at it! Once you are done, cut out your piece(s).


Fold your cut out in half so the blank cardboard is outward.


Next, sew your button about halfway down on the edge of the front of your note book. Make your thread longer so you can use it to wrap around and close your note book.


Trace the outline of your note book on to a piece of paper and glue it on the inside of your notebook to cover up the cereal packaging. You can use plain white paper if you like. I decided to use coloured paper since I was using blank white paper for the inside already... I wanted some colour in there to brighten up my day! :)


Take the paper that you are filling your note book up with and cut it so it's a little bit smaller than the outline of your book. If you want, you can glue the bottom and top sheets to the note book, but you don't have too.


Now, take your embroidery thread and needle and stitch the paper to your note book down the centre spine. And don't worry about the mess on the back, we are going to cover it anyway with the spine!!


Cut out a sheet of decorative paper to go on the front and back spine of your note book. Glue it on with glue (just a tip, glue both the cardboard and the paper, it sticks MUCH better that way).


Yay! Finished!! Now you got yourself a cute new notebook to take to work or class... or if you are like me, in your purse, by your bed, in the bathroom... lol, you never know where or when you are going to think of something that you don't want to forget!!!


Check back for more cool things to make out of recycled goods!!

xOx - L

Click here to Like Designs & Decor on a Dime on Facebook.

Saturday, 14 July 2012

Turn a Book into a Vintage Card or Note Holder!


Lately it seems I've been into thinking of ways to re-use stuff that would otherwise get thrown out. Everywhere you look there are more and more ideas coming out of how to reuse and recycle old products.

So, everyday I am going to try to show at least one DIY project used from recycled materials. Whether it takes me a couple days... or five minutes... it will get done!

I'm constantly looking for places to put important invitations, cards, dates of appointments, bills, mail, the odd picture...etc, my desk has crap ALL over it. I mean I'm organized, but it gets messy in the mean time if you get what I mean.

So I took an old hard cover book that I definitely wasn't going to read (I honestly don't even know why I have it) and I started folding the pages in half. Yes! Once this is done it's gonna fan out and I'll have TONS of spots for things... and it will look pretty damn cool on my desk too!!


The more pages, the more slots, but the longer it takes... just remember that! It's not like you are going to fill in every slot anyways, just random ones here and there! And that way you won't spend too much time routing through to find things! Its a great accent piece too, stick a few black and white photos in it and put it on a shelf or something.


But this is definitely another great "non-thinker" project to sit in front of the t.v with. Or go sit outside, instead of reading a book, fold it! lol Yup, that's my great sense of humor! lol.


Enjoy!

xOx - L

Click here to Like Designs & Decor on a Dime on Facebook.

Bobby Pins: Jewellery & Storage Tips!


Bobby Pins. I know they are a girls best friend. Or one of them anyway. They go right along side the hair elastic or clip. A girl always needs to have one. It never fails you or one of the girls needs something to hold our hair back!

I don't know about you but I always try to keep them on that paper thing they come on for the longest time, cuz then they just get thrown somewhere and lost... pretty darn quickly. Until Now! Here are a few perfect ways to store your pins!

Put your bobby pins in an old Tic Tac container. Keep it in your purse for easy on the go access!


You can put up a magnetic strip (from Dollarama or Craft Store) on the side or the back of your dressing room table! The bobby pins will stick to it!


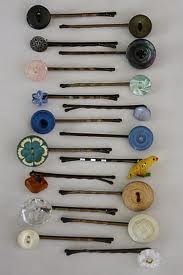
If you are bored of the regular boring colours of the pins and want something different, give them a layer of paint with your fav colours! Put buttons on them or flowers!


Or you can make your pins into a necklace! You can keep them the original colours or paint them the colours of your choice! Put them on a wire necklace after drying and you got yourself a nice cheap but sexy necklace!


Yup, I think I am going to make myself a necklace. I just don't know if I want to leave it original or paint it different colours... I like both. But I think I like colour a little bit more. And hey, when I get bored of the necklace, I've got different coloured bobby pins for my hair! Add a button or a flower and they will be cute as ever!

xOx - L

Click here to Like Designs & Decor on a Dime on Facebook.

Friday, 13 July 2012

DIY Wedding Decor - On a Budget!


Anyone getting married and thinking... how am I ever going to afford this? I've seen lots of couples almost go broke because of their wedding. Whether it was from decorations, the dresses, the food... everything adds up and your pocket book usually looks pretty empty afterwards.

There are so many things that you can do yourself to help you save money. Something that can be used twice is better than something you have to throw out after it's use. Make everyone want to take a piece of your wedding home with them!!

The first big money breaker... The Invites!

Be original with your invite like the one to the right! Head to the photobooth in your local mall, snap some pics and take your slide to get copied. You can make them on the computer or cut and paste. Either way, they will still look great! I know everyone will be talking about them. And it's an invite you will probably keep forever!!!


Grab your sewing machine and start making pouches for cards that you have gotten printed (or even better, made and printed yourself) out of chunks of fabric! This is great for hand delivered invites. You would probably still have to put them in an envelope if going in the mail. So only make a few of them and hand deliver them to your special guests!!! 


You know what they say... sometimes simple is better... or something like that! I love these invites. A nice bright pink or your favourite colour on black or white cardstock for the background. Design and print these beauties off and glue them on cardstock! Done!! And they are just as nice as those fancy white ones you pay the big bucks for!

Next up to think about is your table centre pieces.

What will you do? Do you have your colours picked out yet? If you do, it's time to start thinking about what to put in the middle of your tables. Depending on how many people you have invited, this could get really pricy. So lets look at some neat cheap frugal DIY ideas that can help you save some money for your big day!


I don't know if this candy centre piece would work at every wedding, but depending the theme, this could definitely work. You can usually get candy pretty cheap at the Dollarama even Sugar Mountain isn't that expensive! Get creative, let your mind wander!!


Wrap up old wine bottles (or a 24 of beer bottles) in twine. If you want different colours but only have the normal brown colour of twine, get out your spray paint after you are done wrapping them and give them a coat, make them the colour that you want!

For information on wrapping bottles, click here.


I actually have something similar to this on my kitchen table. Get a bowl/vase bowl and put some water in it. You can dye the water with food colouring if you like. Put in a water lily or a floating fake flower or candle and sprinkle some fake flower petals (Dollarstore or Craft Store) or real flower petals all over the table! Light a couple tea light candles and the table is set!!!!!

Well hope you got some sort of idea for a little bit of help... I know if I ever get married... which honestly, I don't think I will... I have tons of ideas in mind for decor!!

xOx - L

Click here to Like Designs & Decor on a Dime on Facebook.

Wednesday, 11 July 2012

6 DIY: Bedroom Divider Ideas - Ahh What to do!! My Worst Nightmare!!!!


I wanted an office/stock room. He wanted a "Man Cave". So we decided... half and half. Okay, we can live with that, we just won't be able to do completely what we both wanted. But... we love each other soooo compromise is the key... so they say! lol

So in the next little while, we will be focusing on splitting up the room. I decided we should do some sort of divider... I'm just not 100% sure of what I want yet... or what will work being key.

I've seen a lot of ideas around... but we don't really have the room in order yet... so I don't know what's going to work. I thought while rummaging around I might as well share what I find... just in case some other girl has that exact same problem with their man... lol

If you are lucky enough and your room is spacious, you could go with the older painted doors for a room separator. I like the different colours. The flowers give it a cute country look.


This would be kinda cool for by the computer area. Put it around your desk to block you in. I'd put cork board on the other side so I could stick all my sticky notes, pictures and phone #'s on it too! No matter how old chevrons will get, I will still love them...


Love Love Love this room divider. It's made out of pallets!  You can usually score pallets for free, so you can build this goodie for next to nothing! Hang some pictures on it or flowers or bottles. It would even look good painted!! I think this would look great in an open style house... cough cough Mom. LOL.


Believe it or not, the above room divider is made out of old vinyl records and covered with contact paper. They said they tried to paint them, but they weren't satisfied with the results. Doesn't even look like contact paper up close! I think this is sooo cool! Kinda makes me wish I had some old records around! Boo!


This old window wall divider is definitely awesome!!! With the coloured windows! I don't know if that's painted or decoupaged tissue paper, but either way, it looks great!


You can just go with curtains as well. If all else fails. It always looks good. You can even get creative and cut out different fabrics and make strips like the picture above.

Well, I still don't really know what I'm going to do... but that's okay, I'll get there! lol

xOx - L

Click here to Like Designs & Decor on a Dime on Facebook.

Tuesday, 10 July 2012

5 DIY Jewellery Ideas!


What do you keep your jewellery in or on? In a jewellery box? on a rack? a tree? Just in a box? If you are sick of not showing off your jewellery the way it should, then this post is for you!

Here are some great easy designs to make so you can make an arrangement on your dresser or table!

The Jewellery Tree
Grab a tree branch, one with several  twigs coming out in different locations. Depending how much jewellery you have, you can make it bigger or smaller, with fewer or many more branches on it! Get a nice looking vase or jar or even a pepsi bottle. If need be, you might have to fill it with sand or vase filler for it to stand just the way you want it! Hang your necklaces and your earrings up and look at it shine! If you don't like the brown colour sticks, spray paint them a colour that you like or matches your room. Like in the picture below.


The Jewellery Wall
I know a lot of you have probably done this a time or two in your day. Just sticking little nails or thumb tacks in the wall and hanging all of your necklaces on them! If you have a tonne of necklaces, this might be a good idea for you. You can even get creative and put little knick knacks by the nail (or get the new thumbtacks that they have out) so it gives it a little something more to look at!


The Wire Jewellery Tree
If you don't want to go out and get an actual tree, maybe it just won't go with your room, or you just don't plain want it. So make a wire jewellery tree like they have in the stores! Minus those cute little girls with the nice outfits! haha! Anyways, to make this you need some wire and a piece of cork board. You will need something for the base of the tree as well. In this picture, they used a ceramic beading tray, you can probably find something at the Dollarstore if you don't have anything. Start by cutting the wire and wrapping it around each other until it begins to take the shape of a tree. Use needle nosed pliers to curl the ends of the "tree branches" in spirals so it can hold your jewellery! Stick the bottom pieces in the cork and glue the cork in to what you decide to use as your bottom! Let dry and then hang all your necklaces and bracelets!!


Jewellery Board
If you don't like the jewellery stands, try this! Cover a piece of cork board with fabric or lace (if need be, spray paint the cork board). Place it inside a frame, hang it up and start sticking your earrings in! What a great idea! If you have lots of bracelets and necklaces, use small nails or thumb tacks to hold them up!


The Jewellery "Box"
If you have a TONNE of jewellery, this is a great idea for a "Jewellery Box".... although it's big. Proabably takes up a good chunk of the wall, you can make it smaller if you like. Create a box (which also can act later as a shelf.... 2 in 1, love it). Hang up your necklaces and bracelets, throw cute decorative boxes at the bottom for hair accessories or things that can't be hung up!


I have my jewellery on stands, but thinking when I redo my room, I'm going to change that! I really like the framed cork board idea!

xOx

Click here to Like Designs & Decor on a Dime on Facebook.